
Water filters are essential components in maintaining clean, great-tasting water in homes across America. However, these filters require regular maintenance, which includes removal for replacement or cleaning. Knowing how to properly remove a water filter is crucial to avoid damage to your filtration system and to ensure continuous access to filtered water. This guide covers removal techniques for various water filter types, from refrigerator filters to whole-house systems. We’ll explore the necessary tools, step-by-step processes, and troubleshooting tips to help you successfully remove water filters without hassle or professional assistance.
Water filters come in various forms and serve different purposes throughout your home. The most common types include refrigerator filters, faucet-mounted filters, under-sink systems, whole-house filtration units, pitcher filters, and shower filters. Each type uses specific filtration media to remove contaminants from your water.
Filters require removal for several reasons: replacement due to expiration, cleaning of reusable components, system maintenance, or when moving to a new residence. Most manufacturers recommend replacing filters every 2-6 months, depending on water quality and usage, though some whole-house systems may last up to a year.
Neglecting to remove and replace filters on schedule can lead to reduced filtration efficiency, contamination buildup, decreased water flow, and potential damage to the connected appliances or plumbing systems. Regular maintenance ensures optimal performance and protects your investment in water quality.
Content Navigation
Tools and Preparation for Water Filter Removal
Before attempting to remove any water filter, gathering the proper tools and preparing your workspace will make the process smoother and help prevent water damage or injuries. The most commonly needed tools include adjustable wrenches, filter wrenches (specific to your model), towels or buckets for water collection, and gloves to protect your hands.
For preparation, always start by turning off the water supply to the filter. For refrigerator filters, this may mean closing the water valve behind the refrigerator, while under-sink and whole-house systems have dedicated shut-off valves. Have towels ready to catch any water that may leak during removal, and consider placing a bucket underneath for larger systems.
Call 888-896-7031 for Free Local HVAC Quotes – Compare and Save Today!
| Filter Type | Tools Needed | Preparation Steps |
|---|---|---|
| Refrigerator | None or manufacturer’s tool | Turn off water supply, dispense water to release pressure |
| Faucet-Mounted | None or small wrench | Turn off faucet, place towel in sink |
| Under-Sink | Filter wrench, bucket | Shut off water supply, relieve pressure |
| Whole-House | Filter wrench, pipe wrench | Shut off main water supply, drain system |
How to Remove Different Types of Water Filters
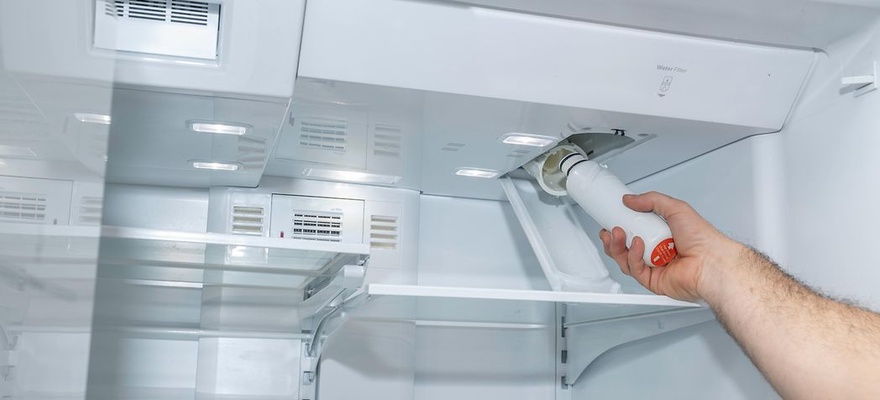
Refrigerator Water Filters
Refrigerator filters are among the most common and straightforward to replace. The location varies by model but is typically found either inside the refrigerator (often in the upper right corner) or at the base grille. For internal filters, push the button or twist the knob to release the filter cartridge, then pull it straight out. Some models require a quarter-turn before removal.
For base grille filters, remove the grille first (it usually snaps off), then locate the filter and either push the button to eject it or twist counterclockwise to release. Some brands like Samsung and LG use push-pull mechanisms, while Whirlpool and GE often use twist-lock designs.
If the filter is difficult to remove, check your refrigerator manual for specific instructions. Never use excessive force as this could damage the filter housing or water line connections.
Faucet-Mounted Water Filters
Faucet filters attach directly to the tap and typically have a simple removal process. Begin by ensuring the diverter valve is in the “unfilterd” position to prevent water flow. For most models, grasp the filter body firmly and twist it counterclockwise until it separates from the mount.
Brands like Brita and PUR use slightly different mechanisms, but most will have release buttons or tabs that need to be pressed while twisting. Be careful not to damage the faucet threads or the filter housing during removal.
After removal, inspect the faucet adapter for any debris or mineral buildup that might affect the installation of a new filter. Clean as necessary before proceeding with replacement.
Call 888-896-7031 for Free Local HVAC Quotes – Compare and Save Today!
Under-Sink Water Filtration Systems
The most critical step for under-sink filter removal is shutting off the water supply completely. Locate the dedicated shut-off valve for the filter system, typically installed on the cold water line feeding the system. Turn it clockwise until fully closed.
Next, relieve pressure by turning on the filtered water faucet until water stops flowing. For standard filter housings, use a filter wrench to turn the housing counterclockwise. Have a bucket ready as water will likely spill from the housing. Once loose, unscrew the housing by hand and remove the old filter cartridge.
For quick-connect cartridge systems like those from Culligan or Aquasana, typically you’ll need to twist the cartridge a quarter-turn and pull down to remove. Some systems may have locking clips that need to be released first.
Whole House Water Filter Systems
Whole house filters require more preparation due to their connection to your main water supply. Start by shutting off the main water supply to your house and opening several faucets to relieve pressure and drain water from the lines. Locate the filter housing, which is typically a large canister installed on your main water line.
Use a filter housing wrench designed for your system to loosen the housing by turning counterclockwise. These housings can be extremely tight, especially if they haven’t been changed regularly. Once loosened, finish unscrewing by hand while supporting the bottom of the housing, as it will be heavy and filled with water.
| System Type | Removal Method | Common Challenges |
|---|---|---|
| Sediment Filter | Unscrew housing with wrench | Heavy housing, mineral buildup |
| Carbon Filter | Unscrew housing with wrench | Carbon residue, stuck housing |
| Spin-Down Filter | Close valves, unscrew bowl | Thread damage, sediment spills |
| Cartridge Systems | Remove housing clips, pull cartridge | O-ring damage, stuck cartridge |
Pitcher Water Filters
Pitcher filters are the simplest to remove and replace. For most models like Brita and ZeroWater, simply lift the reservoir out of the pitcher, flip it over, and press the filter out from the bottom. Some filters may twist out instead of pushing through.
PUR pitchers often require you to squeeze the sides of the filter while pulling up to release it from the reservoir. Always check that the rubber gasket around the filter remains in good condition during removal, as this prevents unfiltered water from bypassing the filter.
After removing the old filter, rinse the reservoir thoroughly before installing a new filter to remove any accumulated debris or residue that might contaminate your fresh filter.
Shower Water Filters
Shower filters install between the shower pipe and showerhead, removing chlorine and other contaminants from bathing water. To remove a shower filter, first ensure you have a secure grip to prevent dropping and damaging the filter or shower fixtures.
Turn the filter housing counterclockwise to unscrew it from the shower arm. Some models may require a wrench, but most can be removed by hand. If the connection is stuck, wrap a towel around the connection point to improve your grip and protect the finish.
Once removed, most shower filters have a cartridge inside that can be taken out by unscrewing or unplugging the filter housing. Brands like Aquasana, Culligan, and Sprite have slightly different designs, so consult your manual for specific instructions.
What to Do After Removing a Water Filter
After successfully removing your water filter, proper disposal and system preparation are essential. Most standard carbon filters can be disposed of in regular household trash, but check local regulations as some areas have special requirements for water filter disposal. Specialty filters containing heavy metals or other contaminants may require hazardous waste disposal.
Clean the filter housing thoroughly before installing a new filter. Use a mild soap solution and a soft brush to remove any debris, sediment, or biofilm that may have accumulated. Pay special attention to O-rings and gaskets, which should be inspected for wear and replaced if necessary to prevent leaks.
For systems with multiple filter stages, take note of the order and orientation of each filter to ensure proper reinstallation. Some systems require running water through new filters for several minutes to activate carbon media or flush out manufacturing residues before use.
Troubleshooting Common Problems During Water Filter Removal
Stuck filters are one of the most common challenges during removal. For stubborn refrigerator filters, try rotating back and forth gently while pulling. Never use tools that could damage the plastic housing. For faucet and under-sink filters, soaking the connection in equal parts vinegar and water can help dissolve mineral buildup that causes sticking.
If you encounter leaking during the removal process, ensure all water supplies are completely turned off. Check that pressure has been fully released from the system before attempting removal again. For persistent leaks after reassembly, inspect O-rings and gaskets for proper placement and damage.
When dealing with broken components, avoid temporary fixes like tape or adhesives. Instead, contact the manufacturer for replacement parts to ensure proper function and prevent water damage. If you encounter stripped threads, cross-threading, or damaged housings, it’s often best to consult a professional plumber to prevent more extensive damage to your plumbing system.
Tips for Getting the Best HVAC Prices
- Prioritize Quality Over Cost
The most critical factor in any HVAC project is the quality of the installation. Don’t compromise on contractor expertise just to save money. - Check for Rebates
Always research current rebates and incentives — they can significantly reduce your overall cost. - Compare Multiple Quotes
Request at least three estimates before making your choice. You can click here to get three free quotes from local professionals. These quotes include available rebates and tax credits and automatically exclude unqualified contractors. - Negotiate Smartly
Once you've chosen a contractor, use the proven strategies from our guide — How Homeowners Can Negotiate with HVAC Dealers — to get the best possible final price.