Choosing the right combination of baseboard heater and thermostat affects comfort, energy use, and installation complexity. Below is a quick comparison of five relevant products ranging from smart thermostats that retrofit high-voltage baseboards to complete heater units and OEM thermostats.
| Product | Type | Key Feature |
|---|---|---|
| Mysa Smart Thermostat LITE | Smart Thermostat (240V) | Wi‑Fi control, app scheduling, energy savings |
| Mysa Smart Thermostat | Smart Thermostat (120–240V) | Adaptive display, temp & humidity alerts |
| meross Smart Thermostat | Smart Thermostat (120–240V) | HomeKit/Alexa/Google compatibility, easy install |
| Cadet F Series 36″ Baseboard Heater | Electric Baseboard Heater | All-metal powder-coated element, requires thermostat |
| Cadet F Series Double Pole Thermostat | Built-In Double Pole Thermostat | Designed for Cadet F Series, simple dial control |
Content Navigation
- Mysa Smart Thermostat LITE For Electric Baseboard Heaters
- Mysa Smart Thermostat For Electric Baseboard Heaters
- meross Smart Thermostat For Electric Baseboard And In-Wall Heaters
- Cadet F Series 36″ Electric Baseboard Heater
- Cadet F Series Double Pole Built-In Baseboard Thermostat
- Buying Guide: Choosing The Right Baseboard Heater And Thermostat
- 1. Determine System Voltage And Wiring
- 2. Match Thermostat Load Capacity To Heater Wattage
- 3. Decide Between Smart And Mechanical Controls
- 4. Check Install Complexity And Safety Requirements
- 5. Evaluate Integration And Feature Needs
- 6. Consider Heater Construction And Room Size
- 7. Verify Manufacturer Compatibility Notes
- 8. Safety Features And Certifications
- 9. Energy Savings And Control Strategy
- 10. Installation Time And Support
Mysa Smart Thermostat LITE For Electric Baseboard Heaters

The Mysa Smart Thermostat LITE is designed specifically for high/line voltage electric heating systems, including 120–240V electric baseboards and fan-forced heaters. The product listing includes a prominent compatibility notice: it does not support low-voltage or two-wire installations and requires at least four wires, including a neutral or a second live wire. The thermostat pairs to a free mobile app for remote control and scheduling.
Key functional points include remote control with a no-cost app and the vendor-stated potential to save up to 26% on energy costs using in-app schedules. The LITE aims at users who want smart scheduling and remote control without subscription fees. Note the compatibility warning before purchase and verify wiring and load limits for safe installation.
Mysa Smart Thermostat For Electric Baseboard Heaters

The full-featured Mysa Smart Thermostat supports 120–240V systems and lists explicit load ratings: up to 1900W at 120V or 3800W at 240V. Like the LITE, it requires at least four wires for functionality and is not compatible with two-wire legacy baseboards.
Call 888-896-7031 for Free Local HVAC Quotes – Compare and Save Today!
Notable features include a 40% smaller form factor compared with older units, Adaptive Brightness Technology, and display behaviors such as Sleep and Wake on Approach. The thermostat integrates with HomeKit, Alexa, and Google Home and offers adaptive scheduling. Buyers should confirm the heater type and wiring before installation and verify that the listed load capacities match the connected baseboard circuit.
meross Smart Thermostat For Electric Baseboard And In-Wall Heaters

The meross Smart Thermostat targets high-voltage electric baseboard, convector, and fan-forced systems. The product lists a maximum output load of 16A, which equates to 1920W at 120V and 3840W at 240V. The manufacturer emphasizes a quick install process, typically under 30 minutes, and notes that the thermostat requires four or more wires in the electrical box.
Integration with Apple Home, Alexa, Google Home, and SmartThings is a highlighted capability, enabling voice control and remote temperature adjustments. The listing frames the device as suitable for users who want smart home ecosystem compatibility paired with high-voltage baseboard control. Verify wiring and circuit capacity during planning and use recommended safety practices when installing.
Cadet F Series 36″ Electric Baseboard Heater
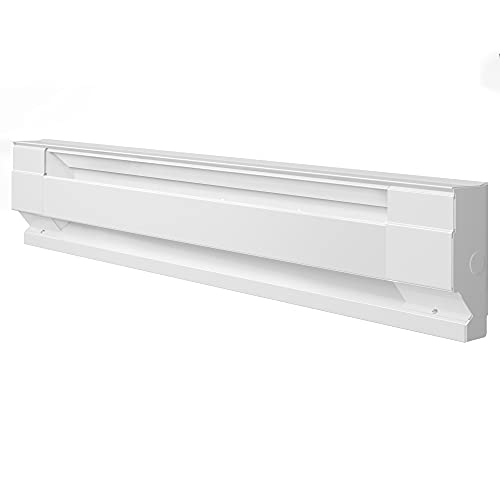
The Cadet F Series 36″ baseboard heater is a conventional hardwired electric baseboard unit intended for use with a separate thermostat. The listing notes this unit requires a thermostat and describes construction details such as 25-gauge steel and 20-gauge junction box with ground. It is an all-metal design with powder coat finish, suitable for in-wall mounting.
Call 888-896-7031 for Free Local HVAC Quotes – Compare and Save Today!
Because the heater is sold without a thermostat, pairing with a compatible control device is necessary. The Cadet F Series is commonly used with OEM built-in thermostats or compatible line-voltage thermostats rated for the unit’s wattage and voltage. Confirm heat output and room sizing to ensure the 36″ length and 750W rating (or variant) match your heating requirements.
Cadet F Series Double Pole Built-In Baseboard Thermostat

The Cadet F Series Double Pole Thermostat is engineered for direct mounting to Cadet F Series baseboard heaters. It offers a temperature range of 45º–80ºF (7º–27ºC) and uses a large adjusting twist dial for straightforward control. The listing highlights easy installation that mounts to either end of compatible baseboard heaters, which can simplify retrofits or replacements.
Because it is designed specifically for Cadet F Series heaters, this thermostat can eliminate extra wiring in some setups. It is a mechanical control rather than a smart Wi‑Fi thermostat and is suitable for users who prefer a built-in, OEM-compatible solution for localized temperature adjustment.
Buying Guide: Choosing The Right Baseboard Heater And Thermostat
This buying guide outlines the most important considerations when selecting an electric baseboard heater and thermostat combination. Focus on compatibility, wiring, load capacity, control type, and installation constraints.
1. Determine System Voltage And Wiring
Electric baseboard systems are usually 120V or 240V. Many smart line-voltage thermostats require at least four conductors (including neutral or a second live) and will not work with older two-wire installations. Check the existing wiring and panel breaker ratings before selecting a thermostat.
2. Match Thermostat Load Capacity To Heater Wattage
Thermostats specify maximum loads (for example, 1900W at 120V or 3800W at 240V). Ensure the thermostat’s rated capacity exceeds the combined wattage of the connected baseboard units on that circuit. Underrating a thermostat risks frequent trips or component failure.
3. Decide Between Smart And Mechanical Controls
- Smart Thermostats (Mysa, meross): Provide remote control, scheduling, and integrations with smart home platforms. They can offer energy-saving schedules and remote diagnostics.
- Mechanical Or Built-In Thermostats (Cadet double pole): Simple, reliable, and often easier to install in OEM heater housings. No Wi‑Fi dependency or app learning curve.
4. Check Install Complexity And Safety Requirements
High-voltage devices should be installed by a qualified person if you are not comfortable with electrical wiring. Confirm that junction boxes, grounding, and breaker sizes meet local electrical codes. For retrofit installs, confirm that the thermostat’s wiring needs can be satisfied without major rewiring.
5. Evaluate Integration And Feature Needs
If you want voice control, remote scheduling, or energy reports, choose a thermostat with confirmed compatibility to your ecosystem (HomeKit, Alexa, Google Home). If you prefer minimal tech, a built-in dial thermostat may be preferable. Also consider display behavior (adaptive brightness, approach wake) if the unit will be in frequently occupied rooms.
6. Consider Heater Construction And Room Size
Choose heater length and wattage to match room heat loss. Cadet and KING style units list construction materials and junction box requirements; these help assess durability and mounting needs. Confirm whether a heater is hard-wired or plug-in and whether it requires a separate thermostat.
7. Verify Manufacturer Compatibility Notes
Many smart thermostats include explicit compatibility warnings. For example, Mysa emphasizes it does not work with low-voltage or two-wire systems and requires specific wiring. Read product listings and wiring diagrams carefully before purchase to avoid returns and unsafe installs.
8. Safety Features And Certifications
Look for overheat protection, automatic cutouts, grounded junctions, and safety listings. Some heaters include tip-over switches or stay-cool bodies for portable or freestanding models, while built-in baseboard units depend on correct wiring and thermostat function for safe operation.
9. Energy Savings And Control Strategy
Smart thermostats often advertise energy savings when schedules are used. Evaluate whether programmable schedules, adaptive features, and occupancy-based control will meaningfully reduce runtime for your occupancy patterns. For continuous low-level heat needs, simple thermostats may suffice.
10. Installation Time And Support
Some products emphasize easy installation and offer documented steps that can take under 30 minutes for experienced DIYers, while others need more time or professional installation. Check support resources, wiring diagrams, and return policies before committing.
Tips for Getting the Best HVAC Prices
- Prioritize Quality Over Cost
The most critical factor in any HVAC project is the quality of the installation. Don’t compromise on contractor expertise just to save money. - Check for Rebates
Always research current rebates and incentives — they can significantly reduce your overall cost. - Compare Multiple Quotes
Request at least three estimates before making your choice. You can click here to get three free quotes from local professionals. These quotes include available rebates and tax credits and automatically exclude unqualified contractors. - Negotiate Smartly
Once you've chosen a contractor, use the proven strategies from our guide — How Homeowners Can Negotiate with HVAC Dealers — to get the best possible final price.